MineColonies Mod Guide: Build and Manage Your Own Thriving Colony
MineColonies lets you build and manage a fully functional colony with NPC workers who farm, mine, build, guard, and craft on your behalf. With over 50 building types, a deep research tree, dynamic raid events, and citizen happiness systems, this mod transforms Minecraft into a city-builder RPG. This guide covers everything from placing your first Supply Camp to defending against Pharaoh raids.
Overview
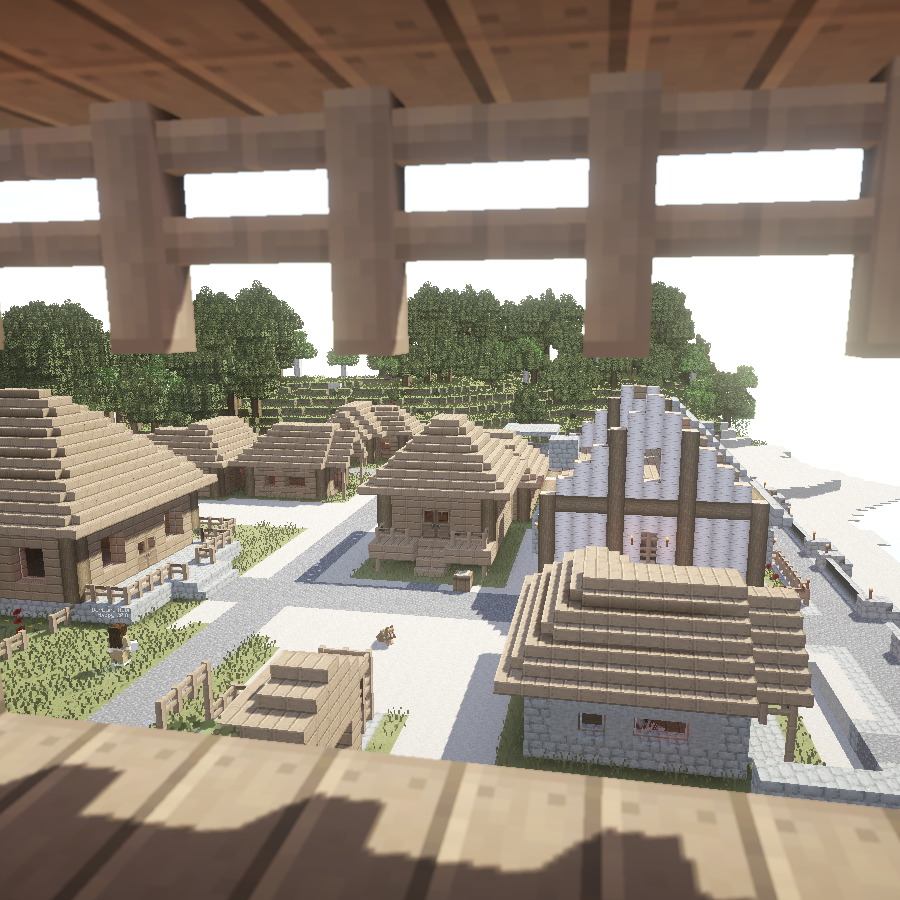
MineColonies is a colony simulation mod that adds over 50 building types and dozens of NPC worker roles to Minecraft. Your colonists will mine, farm, build structures, craft items, guard against raids, and even raise animals, all without you needing to lift a Pickaxe (though you certainly can help). Every building follows a 5-level upgrade path, each level expanding the structure's footprint and unlocking better capabilities for the worker assigned to it.
The mod includes a full research system accessed through the University, a dynamic raid system with five enemy factions, citizen happiness and disease mechanics, and over 10,000 schematic styles so your colony can match any biome. You can browse all 88 recipes and 53 items this mod adds using the tabs on this page. This guide will walk you through every system from founding your colony to surviving endgame Pharaoh raids.
Getting Started: Your First Colony
- 1
Craft a Supply Camp or Supply Ship
Your colony begins with either a
 Supply Camp (crafted from 5 Chests) or a
  Supply Ship (crafted from 5 Boats). Find a flat area at least 8x8 chunks in size, ideally near resources that match your desired building style. For example, if you want a desert colony, settle near Sand. Right-click the Supply Camp to place it, choose a style pack (Medieval Oak, Urban Savannah, Shire, and many more), then confirm placement. Inside the camp you'll find a Build Tool and a Town Hall block.
 - 2
Place Your Town Hall
Use the Build Tool (right-click the ground) and navigate to Fundamentals > Town Hall. Position it centrally since your colony border extends outward from here (default 4-chunk radius, expandable up to 20 chunks). Preview higher levels to plan space. Once placed, right-click the Town Hall block and sign the covenant to officially found your colony. Your first 4 citizens will spawn shortly after.
- 3
Build a Builder's Hut
Nothing gets built without a Builder. Craft a Builder's Hut block and place it using the Build Tool near your Town Hall. A citizen will automatically be assigned as the Builder. Right-click the Builder's Hut workstation, go to Build Options, and press Build Building. The Builder will request materials (shown under Required Resources) which you need to supply. A Level 1 Builder can only construct Level 1 buildings and use Stone-tier tools.
- 4
Supply Resources and Watch Your Colony Grow
Craft a
 Resource Scroll and a
  Clipboard to track what your Builder needs. The Resource Scroll (shift-right-click on the Builder's Hut) shows the current build's material list. The Clipboard shows all open citizen requests. Deliver materials to the Builder's Hut inventory or click the arrows in the Required Resources tab to transfer directly from your inventory. Help clear trees and obstacles near build sites to speed things up.
 - 5
Build Your Essential Infrastructure
After the Builder's Hut, your priority buildings should be: a Tavern (housing for citizens and visitors), a Fisherman's Hut or Farmer's Hut (food production), a Courier's Hut (automated item delivery between buildings), and a Warehouse (centralized storage). Build one thing at a time per Builder to avoid resource conflicts. Once these are running, you'll have a self-sustaining colony ready to expand.
When placing buildings, always preview them at Level 5 using the Build Tool. Buildings expand significantly as they upgrade, and you don't want Level 5 structures overlapping each other. Plan your colony layout around the final footprint, not the small Level 1 version.
Colony Borders and Chunk Claims
When you found a colony, it immediately claims a square of chunks around the Town Hall (default 4-chunk radius, configurable up to 15). As you place buildings near the border, the colony automatically extends its territory outward. The maximum colony size is 20 chunks radius (320 blocks from the Town Hall) by default, creating a potential 640x640 block territory.
Colony protection prevents non-member players from breaking blocks, interacting with objects, or attacking citizens within your borders. Explosions default to damaging entities but not blocks inside colony territory. Colonies must be spaced at least 8 chunks (128 blocks) apart from each other. You can see your colony border by holding the Build Tool.
The Builder System
Builders are the backbone of MineColonies. Every structure in the colony is constructed, upgraded, repaired, and deconstructed by Builders. A Builder's Hut level directly limits what level of buildings that Builder can work on: a Level 1 hut can only build Level 1 structures, Level 2 builds up to Level 2, and so on. Building multiple Builder's Huts (up to 5 is recommended) lets you run parallel construction projects and dramatically speeds up colony development.
Builders use two key skills: Adaptability (faster block placing) and Athletics (faster block breaking). When assigning workers, check these stats to find the best candidate. Tool restrictions also follow building level: Level 1 allows Stone tools, Level 2 Iron, Level 3-4 Diamond, and Level 5 enchanted Diamond. Sometimes Builders get stuck inside partially constructed rooms that don't have doors yet. Use the Recall Worker button in the Builder's Hut interface to teleport them out.
Citizens: Skills, Happiness, and Health
The 11 Skills
Every citizen has 11 skills that determine how effectively they perform different jobs. Skills level up passively as citizens work, and each skill has a complementary skill that rises alongside it and an adverse skill that tends to decrease. The skills are: Athletics, Dexterity, Strength, Agility, Stamina, Mana, Adaptability, Focus, Creativity, Knowledge, and Intelligence.
Each job benefits from two primary skills. Builders want Adaptability (block placing speed) and Athletics (block breaking speed). Farmers want Stamina and Athletics. Knights want Adaptability (attack speed) and Stamina (HP bonus). Rangers want Agility (damage bonus) and Adaptability (range and attack delay). When hiring for important roles, check citizen skills in their info panel and assign the best match. Citizens level up their job-relevant skills over time, so even a mediocre start will improve.
Happiness System
Colony happiness is a weighted average of 13 modifiers, scored on a scale of 0 to 10. The heaviest-weighted factors are Housing (weight 4.0) and Security (weight 4.0). Citizens in higher-level Residences are happier (a Level 5 home maxes out the housing factor). The security factor rewards maintaining roughly 1 Guard per 1.5 workers. Other significant factors include Employment (weight 2.0), Health (weight 2.0), Saturation (weight 2.0), and Social factors (weight 2.0) which track the overall wellbeing of the colony.
When a citizen dies, all other citizens mourn for 3 days (death modifier weight 3.0). Surviving a raid without casualties gives a 3-day happiness boost. Building a Mystical Site provides a passive happiness bonus, with a Level 5 Mystical Site giving a 3.5x factor. The University's Happiness research chain (Circus through Theater) can boost total happiness by up to 50%.
Citizens can catch three diseases: Influenza (very common, cured with Carrot + Potato), Measles (uncommon, cured with Dandelion + Kelp + Poppy), and Smallpox (rare, cured with Honey Bottle + Golden Apple). Diseases spread between citizens at a 1% chance per contact. Keep a stack of Carrots and Potatoes in every citizen's inventory to auto-cure the most common illness. Build a Hospital and research Masks to cut transmission rates in half, then Vaccines to extend post-cure immunity from 3.5 minutes to 35 minutes.
Disease Reference
| Influenza | Very Common (weight 100) — Cure: Carrot + Potato |
| Measles | Uncommon (weight 10) — Cure: Dandelion + Kelp + Poppy |
| Smallpox | Rare (weight 1) — Cure: Honey Bottle + Golden Apple |
Buildings by Category
Fundamentals
The Town Hall is the administrative center of your colony. It displays colony-wide stats, happiness breakdowns, citizen lists, work orders, and permissions. The Town Hall also determines the colony's chunk claim center. Upgrade it to unlock teleportation between allied colonies (Level 3+).
The Builder's Hut is required before any construction can begin. Build multiple for parallel construction. The Residence houses citizens and its level determines how many beds are available and what food quality citizens demand. Higher-level Residences require more complex meals. The Tavern provides beds for 4 citizens plus attracts Visitors who may become permanent colonists. The Warehouse is centralized storage accessible by Couriers and all workers.
Food Production
The Fisherman's Hut is the fastest way to get food early on. The Fisherman needs a water source within range (they'll complain if none is found). The Farmer's Hut requires Scarecrow fields to be placed and assigned. Each  field needs a seed type set via the Scarecrow block. The Farmer uses Stamina and Athletics skills. The Cook's Hut (Restaurant) prepares meals and distributes food to hungry citizens automatically. When a citizen's hunger drops to 6 shanks or below, they head to the Restaurant. At Level 3 the Cook gains a Cook's Assistant who handles crafting recipes. The Baker's Hut specializes in baked goods like Bread, Cookies, Cake, and Pumpkin Pie (baked from dough items in a Furnace). The Baker uses Knowledge and Dexterity skills.
Resource Gathering
The Lumberjack's Hut (Forester) automatically chops and replants trees. You can configure which Saplings they use via the Saplings list. The Lumberjack uses Strength and Focus. The Miner's Hut digs mine shafts underground in a structured pattern. The Miner requires a valid cobblestone column and ladder placement. Higher building levels unlock deeper mining and better tool tiers. Research can boost ore yields by up to 200%.
The Simple Quarry and Medium Quarry provide open-pit mining with a Quarrier worker. They dig out large rectangular areas. The Simple Quarry requires an Iron Pickaxe in the recipe, while the Medium Quarry needs a Diamond Pickaxe.
Crafting and Processing
MineColonies includes a full chain of crafting buildings. The Blacksmith crafts tools, weapons, and armor (Strength and Focus skills). The Stonemason works with Stone-based materials. The Sawmill handles Wood crafting. The Smeltery processes ores (you need to set which ores to smelt in the Ores list). The Stone Smeltery converts Stone variants. The Crusher breaks down blocks (Cobblestone to Gravel, Gravel to Sand, etc.) with a configurable daily limit. The Sifter processes materials through meshes (String, Flint, Iron, Diamond) for bonus drops, with better meshes unlocked through research.
Additional crafting buildings include the Fletcher (arrows and bows), Glassblower (Glass items), Dyer (dyes and colored blocks), Mechanic (Redstone components), Concrete Mixer (Concrete from Concrete Powder), and the Plantation (Sugar Cane, Bamboo, Cactus, and other growable crops). You can teach workers custom recipes by placing ingredients in the crafting recipe slots of their building interface.
Animal Husbandry
Five herder buildings handle different animals: the Chicken Herder (Eggs, Feathers, Chicken), Cowboy (Beef, Leather, and optionally Milk), Shepherd (Wool and Mutton), Swine Herder (Pork), and the Rabbit Hutch (Rabbit, Hide, Rabbit's Foot). Each has settings for breeding and feeding. The Beekeeper harvests Honey and Honeycombs from Bee Hives. Make sure to set flowers for the Beekeeper or they'll complain about having no flowers to work with.
Logistics
The Courier's Hut (Deliveryman) is essential for a functioning colony. Couriers automatically move items between buildings, the Warehouse, and workers who need supplies. They use Agility and Adaptability. Without a Courier, you'll have to hand-deliver everything. The Warehouse stores items and Couriers pull from it to fulfill requests. The Post Box lets you submit item requests to the colony's request system. The Stash is a personal drop-off chest that Couriers empty into the Warehouse.
Military and Defense
Guard Types
MineColonies has three guard specializations, all assigned through Guard Towers or Barracks Towers. Knights are melee fighters who use Adaptability for attack speed (base 32-tick delay, reduced by Adaptability/3 down to a minimum of 16 ticks) and Stamina for HP (gaining Stamina level + 15 bonus HP on level-up). They deal 3 base physical damage and can research Shield blocking, Whirlwind AOE attacks, and Taunt (forcing all nearby mobs to target them).
Rangers are ranged fighters using Agility for damage (base 2 damage plus Agility/5 bonus) and Adaptability for range and attack speed. Their base range is 10 blocks, extendable up to 24 blocks. Attack delay starts at 60 ticks and decreases by their Adaptability level. Research can unlock Fire Arrows, Arrow Piercing II, and Multishot (25-50% chance of firing double arrows).
Druids are potion-throwing support guards who use Mana and Focus. They gain Mana level/2 + 12 bonus HP on level-up. The Panoramix research (costs 64  Mistletoe) enables them to use enhanced potions for healing allies and debuffing enemies. Druids are the newest guard type and excel at supporting Knights and Rangers in mixed defense setups.
Guard Armor Progression
Guard armor is restricted by building level. At Level 1-2 they use Gold Armor, Level 2-3 Chainmail, Level 3-4 Iron, and Level 4-5 Diamond. Leather Armor is always available. Shields require the Avoidance research (Guard Tower Level 3). Guards can be set to Patrol (walk a route), Guard (stay in one spot), or Follow (follow a player). The Guard Tower houses one guard per type, while the Barracks Tower supports multiple guards at the building's level.
Training Facilities
The Combat Academy trains Knight squires (Adaptability and Stamina), while the Archery trains Ranger recruits (Agility and Adaptability). Both require the relevant research to unlock (Improved Swords for Combat Academy, Improved Bows for Archery). Training buildings can hold workers equal to the building level, so a Level 5 Archery trains 5 Rangers simultaneously. The Barracks is a compound building that automatically generates Barracks Towers as it upgrades, providing a scalable military complex.
Guard Type Comparison
| Knight | Ranger | Druid | |
|---|---|---|---|
| Role | Melee Fighter | Ranged Fighter | Potion Support |
| Primary Skill | Adaptability | Agility | Mana |
| Secondary Skill | Stamina | Adaptability | Focus |
| Base Damage | 3.0 | 2.0 + Agility/5 | Potion-based |
| HP Bonus/Level | Stamina + 15 | Standard | Mana/2 + 12 |
| Attack Delay | 32 - Adapt/3 ticks (min 16) | 60 - Adaptability ticks | Potion cooldown |
| Special Abilities | Shield, Taunt, Whirlwind AOE | Fire Arrows, Piercing II, Multishot | Healing, Debuff Potions (Panoramix) |
Raids and Enemy Factions
Your colony will face periodic raids from five distinct enemy factions. Raids occur on average every 14 nights (minimum 10 nights between raids, configurable). The difficulty scales dynamically with your colony's raid level, which increases as your colony grows. Enemy health starts at a base of 10 HP and increases by 0.025 HP per raid level. Damage follows a similar formula: 2.0 base plus a scaling factor based on difficulty and raid level (capping at 3x the base modifier).
The Five Factions
Barbarians are the most common raiders, consisting of melee Barbarians with Swords, Archer Barbarians with Bows, and Chief Barbarians with 1.5x HP and bonus armor. They can break through walls when stuck (configurable) and will break down doors. They spawn in a camp near your colony border.
Pirates arrive on ships and include melee Pirates with Scimitars, Archer Pirates, and Captain Pirates with 1.3x HP. Their ships persist for 3 days before despawning. Egyptians feature Mummies, Archer Mummies, and the fearsome Pharaoh who serves as a boss with 4.5x the normal HP scaling. The Pharaoh is the most dangerous single raider in the game.
Norsemen include melee Norsemen, Norsemen Archers, Shieldmaidens, and Norsemen Chiefs with 1.5x HP. Amazons field Archer Amazons, Spearman Amazons, and Amazon Chiefs who are especially tough with 4x the normal armor bonus. At higher difficulty (5+), Chiefs of all factions apply Speed II buffs to nearby raiders every 48 seconds within a 7-block radius. Raids can include up to 80 raiders per wave at default settings.
By default, raiders will break through walls and doors when they get stuck. Simple wall defenses alone won't stop them. You need active Guard patrols and towers to intercept raiders before they reach your buildings. If you want to disable wall-breaking, set 'doBarbariansBreakThroughWalls' to false in the server config, but this significantly reduces raid difficulty.
The University and Research
The University building unlocks the research system, which is divided into three main trees: Civilian, Combat, and Technology. Each research requires specific items as costs (like Books, Golden Apples, or Bone Meal) and takes time to complete. A Researcher worker at the University processes research, with their Knowledge skill determining speed. Higher University levels allow researching higher-tier upgrades.
Civilian Research
The Civilian tree focuses on colony capacity and citizen wellbeing. The citizen cap chain (Outpost, Hamlet, Village, City) increases your maximum population from the base 25 up to 1000+. The First Aid chain adds up to +20 bonus HP to all citizens. The Happiness chain (Circus through Theater) provides up to +50% total happiness. Walking speed researches (Nimble through Athlete) give citizens up to +25% movement speed. Other notable researches include Rails (citizens use Minecart rails), Vine Climbing, and Night Owl (workers stay up 1-2 extra hours).
Combat Research
The Combat tree enhances guard effectiveness. Knight damage increases from +0.5 (Quick Draw) up to +4.0 (Savage Strike). Ranger damage follows the same progression from Precise Shot to Deadly Aim (+0.5 to +4.0). Shield blocking chance (Squire through Captain of the Guard) adds +5% to +50% block chance for Knights. Multishot chance (Trick Shot through Master Bowman) gives Rangers +5% to +50% chance of firing double arrows. Armor chains can double the effective armor for both Knights and Rangers. The Taunt research lets Knights force all mobs to target them, while Whirlwind gives Knights an AOE attack.
Technology Research
The Technology tree unlocks advanced buildings and production upgrades. Key chains include the farming yield line (Bonemeal through Magic  Compost, up to +200% crop yield), Sifter mesh upgrades (String, Flint, Iron, Diamond, unlocked through various crafting buildings), and the Miner ore bonus chain (More Ores I through V, +10% to +200% ore drops). The "Open the Nether" research unlocks the Nether Mine building, and "Magic Potions" enables the Alchemist. Building-specific unlocks include the Composter, Florist, Dyer, and Plantation.
Education and Advancement
The Library employs Students (2 per building level) who passively improve their Intelligence skill. The School trains child citizens as Pupils, who gain Intelligence XP based on their Teacher's Intelligence level. The School requires carpet blocks placed for seating. The Enchanter's Tower drains XP from nearby worker buildings (set which buildings to drain in the Enchanter Stations module) and uses it to enchant items. The Enchanter uses Mana as their primary skill.
Special Buildings
The Hospital is where sick citizens go to be cured by Healers. Keep cure materials stocked (especially Carrots and Potatoes for Influenza). The Graveyard is managed by the Undertaker who buries deceased citizens. With the Resurrection Chance research (based on the Undertaker's Mana skill at 0.125% per level) and the Raising the Dead research (enables Totem of Undying use), dead citizens have a chance to come back.
The Mystical Site provides a passive happiness boost to the entire colony (factor of 1.0 + building level/2, so a Level 5 gives a 3.5x happiness factor). The Nether Mine sends workers to gather Nether resources without building a portal infrastructure. The Alchemist brews potions for Druid guards and colony use, unlocked through the Magic Potions research chain.
Progression Guide
Early Game (Colony Levels 1-2)
Your first priority is establishing the core loop: Builder's Hut, Tavern, food production (Fisherman's Hut), a Courier's Hut, and a Warehouse. Build one thing at a time per Builder. Upgrade the Builder's Hut to Level 2 as soon as possible so you can build Level 2 structures. Place a Guard Tower early since raids can start happening at any time, and the security happiness factor rewards having guards. Keep Carrots and Potatoes in every citizen's inventory to handle Influenza.
Mid Game (Colony Levels 2-3)
Expand your workforce with a Lumberjack, Miner, and Farmer. Build a Cook's Hut to automate food distribution. Add Residences to house your growing population. Build the University and start researching the citizen cap chain and First Aid. Get a second (or third) Builder's Hut to speed up construction. Establish crafting infrastructure: Blacksmith for tools and armor, Smeltery for ores, and a Sawmill for wood products. Upgrade Guard Towers to Level 3 for Iron armor access and Shield use.
Late Game (Colony Levels 4-5)
Push all key buildings to Level 4-5. Build Barracks for a military compound with multiple guard types. Research advanced combat abilities (Multishot, Whirlwind, Taunt). Upgrade to Diamond-tier equipment for guards. Build a Hospital with stocked cures. Add the Mystical Site for happiness. Unlock the Nether Mine and Alchemist through research. At this stage, your colony should be largely self-sustaining with Couriers automatically distributing resources, guards defending against raids, and workers producing all the materials you need.
Colony Progression
Configuration Options
MineColonies has extensive server configuration. The most impactful settings are: initialCitizenAmount (default 4, range 1-10) controls how many citizens spawn when founding a colony. maxCitizenPerColony (default 250) sets the hard population cap. builderBuildBlockDelay (default 15 ticks) controls how fast Builders place blocks; lower values speed up construction significantly.
For raids, barbarianHordeDifficulty (default 5, range 0-10) scales enemy health, damage, and wave size. Setting it to 0 effectively disables raids without turning them off entirely. averageNumberOfNightsBetweenRaids (default 14) controls raid frequency. maxBarbarianSize (default 80) caps the number of raiders per wave. The workersAlwaysWorkInRain setting (default false) makes workers stop during rain unless you've researched the working-in-rain upgrade.
Unique Items and Blocks
Beyond hut blocks, MineColonies adds several utility items. The Build Tool (crafted from a Stick and an Emerald as the Shape Tool) is your primary placement interface. The Resource Scroll shows required materials for the linked Builder. The Clipboard (shift-right-click on any building) displays all open citizen requests. The Build Goggles let you see building previews while wearing them.
The Rally Banner summons all guards to a specific location, useful during raids. Racks are the colony's internal storage blocks placed inside buildings. Waypoints help citizen pathfinding by marking preferred routes. Construction Tape is automatically placed around buildings under construction. Colony Banners are decorative flags in your colony colors. MineColonies also adds craftable Chainmail Armor using Iron Ingots and Iron Nuggets, and Composted Dirt for farming.
Frequently Asked Questions
Why won't my Builder start building?
Make sure you've clicked Build Building in the hut's Build Options menu. Simply placing the hut block doesn't start construction. The Builder also needs the required materials in their hut's inventory and the correct tool tier. Check for a cog icon above their head, which indicates they need something. Right-click them to see what they're requesting. If they're stuck, use the Recall Worker button in their Builder's Hut interface.
How do I get more citizens?
Citizens arrive in three ways: they spawn automatically when you have available beds (in Residences or the Tavern), visitors at the Tavern can be recruited as permanent citizens, and existing citizens can have children if they share a home and the colony has available housing. The default citizen cap is 25 and must be increased through University research (Outpost +25, Hamlet +75, Village +125, City +1000).
My citizens keep getting sick. How do I prevent disease?
Keep a stack of Carrots and Potatoes in every citizen's inventory to auto-cure Influenza, which accounts for about 90% of all illness. Build a Hospital and assign a Healer for proper treatment. Research Masks at the University to cut disease transmission by 50%, and Vaccines to extend post-cure immunity from 3.5 minutes to 35 minutes. The diseaseModifier config (default 5) can be increased for less frequent illness.
How do I stop raids or make them easier?
Set 'doBarbarianSpawn' to false in server config to disable raids entirely. To reduce difficulty, lower 'barbarianHordeDifficulty' (default 5, range 0-10). Setting it to 0 makes raids trivially easy. You can also disable wall-breaking with 'doBarbariansBreakThroughWalls = false' and door-breaking with 'shouldRaiderBreakDoors = false'. For a legitimate challenge, invest in Guard Towers, research combat upgrades, and use the Rally Banner to concentrate your guards during attacks.
Does MineColonies require any other mods?
Yes, MineColonies requires Structurize (the schematic/blueprint library), BlockUI (the custom GUI framework), Domum Ornamentum (decorative block variants), and Multi-Piston (multi-block piston mechanics). All four are developed by the same team and should be downloaded together. Most modpacks that include MineColonies bundle these dependencies automatically.
How do I expand my colony borders?
Place buildings near the edge of your current colony border. Each new building automatically claims the chunks around it, extending your territory outward. The maximum colony radius is 20 chunks (320 blocks) from the Town Hall by default. You can see your current borders by holding the Build Tool. If a building placement error says it's 'partially outside the colony,' you need to place an intermediate building closer to the border first to extend it.